Product Details
Thomson has been providing custom special machining on 60 Case® linear shafting for more than 70 years. Our skilled machinists can perform a wide variety of special machining operations on the ends or along the length of the shaft to provide exactly the part needed for your application. Standard shafting, which is available from stock, can be cut with special length tolerances. Shafting may also be drilled with a variety of radial holes and tapped if needed. Shafts can be supplied with flats, keyways and reduced diameters. Shafts can also be plated.
Standard straightness is .001” per foot., cumulative (.002” TIR). Special straightness tolerance is .0005” per foot, cumulative (.001” TIR), for all diameters.
Special Shaft Machining
Questions
Test your knowledge
There is an extra charge for all special machining operations. For pricing on a specific design, send your drawing or technical description to Thomson (thomson@thomsonlinear.com) for quotation.
Special Length Tolerances
Standard length tolerance is for ± 1/32” for shafts less than 2” diameter and ± 1/16” for 2” diameter and larger. Special length tolerances of ± .010”, ± .005” and ± .002” can be achieved on shafts up to 4” in diameter.Special Straightness Tolerances
Special Shaft Machining
For all machining requirements with turned ends, Thomson will anneal the end. The annealing process may cause approximately 1/4” to 1/2” of heat travel from machined area (depending on major shaft O.D.). Hardness of major shaft diameter near the machined area will be below the Rockwell hardness for the material. If annealing effects are objectionable, alternate machining processes can be used which prevent major diameter softening at higher cost.
See below for examples of special end machining that is possible on shafting.
ChamferCut to length shafts are de-burred to remove sharp edges as standard. The chamfer will be approximately:
- 1/32” x 45˚ for diameters less than 1”
- 1/16” x 45° for diameters 1” and larger
Specific chamfers or chamfers of special dimensions can be supplied for an additional charge.
Threaded Shaft DiameterStandard threads are either Unified National Coarse or Unified National Fine, Class 2-A fit. Shafts will be annealed and soft around the circumference of threaded areas within the case.
Reduced DiametersStandard diameter tolerance on turned down diameters is ± .001”. Special tolerance of ± .0001” is available. Runout is within .001” total indicator reading. Shafts are annealed and soft in turned down sections within case. Two-step shaft diameter reduction is also available.
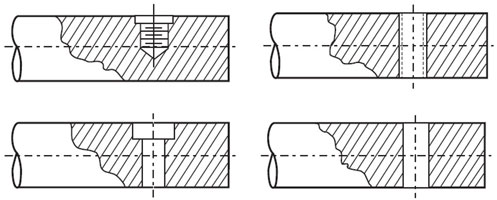
Radial HolesVarious radial holes can be machined into the shaft
- Drilled and tapped to center of the shaft
- Drilled and tapped through the shaft
- Drilled through and counterbored
- Drilled through
- Drilled through and reamed
Typical tolerance for alignment and location is ± .010”. The shaft will be annealed and soft around circumference in hole area. Threads can be either U.N.C. or U.N.F. Class 2-B thread. Hole diameter tolerance can be as good as ± .001”
Drilled Spot for Set ScrewsLocation tolerance ± 1/64”. Capability exists for ± .002”. Drill sizes 1/8” thru 3/4”.
Coaxial HolesU.N.C. or U.N.F. Class 2-B thread. Concentricity ± .005”. Certain diameters and materials will be annealed and remain soft around the circumference. Note: Holes may also be located on a “bolt” circle. Location tolerance is .010”.
Retaining ring grooveLocation tolerances between grooves ± 1/64” or ± .005”. Tolerance of ± .005” for maximum ring groove spacing is 96”.
Joining shaftsJoining two or more shafts together to get longer lengths is possible. Some of the methods available are as follows:
- Threaded and ground joints: for 3/4” through 4” and 20mm thru 80mm diameter shaft for lengths up to 20 feet.
- Dowled joints: with concentricity ± .010” for 1/2” thru 4” and 12mm thru 80mm diameter shaft.
- Butted Joints: Should be considered as the most economical solution before considering alternatives. Ends machined square, no chamfer. Available for all nominal shaft diameters.
FlatsShafts can be machined with one or multiple flats. The location tolerance is as follows:
- One flat: Location tolerance ± .015”.
- Multiple flats: Alignment and location tolerance ± .005”.
Flats extending over large portion or entire length of shaft are not offered. Cutting long sections into the hardened layer would cause considerable warping and subsequent straightening cost is prohibitive.
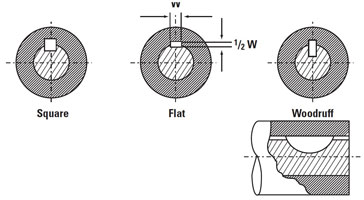
KeywaysKeyways may be square, flat or American Standard Woodruff. Available for nominal shaft diameters from 1/2” through 4”.


